I am so looking forward to summer, can’t wait for picnics and BBQs, eating dinner outside, hiking, farmer’s market at their peak, cooking with the kids and all those fun summer activities. We eat salads year round, but some of the best salads are the summer ones. The selection of vegetables and fruits during the summer is amazing, it’s impossible to take a trip to the farmer’s market and not be inspired to use the ingredients to prepare something delicious. These salad recipes are some of my favorite summer salads. You can make these salads year-round, but they taste even better during the summer. Here's the list of ten salads but today I'm going to show you how to make "Mango avocado salad " :)
1) Mango avocado salad – Arugula salad with mango, avocado and red onions tossed with spicy orange vinaigrette. This salad is great on its own or can also be enhanced by adding grilled shrimp or grilled chicken (or grilled anything). 2) Grilled pork salad with beets and goat cheese dressing – This salad can be made partially
Mix two egg whites with half of a mashed-up avocado; leave it in hair for 15 minutes, then wash and condition. It's a fast and inexpensive natural remedy that leaves hair super-smooth ;)
Pimples can be successfully removed at home. In order to achieve this, you will have to be consistent in your facial care. Below you will find some masks recommended for dealing with pimples.
The yeast mask Mix fresh live yeast the amount of a walnut with two tablespoons of whole milk. Blend until a paste forms and spread it on your face. Keep the paste on for 20 minutes and remove it with a cotton ball dipped in chamomile brew. Do not wash your face with water for at least two hours after the procedure. Do this mask once a week for a month and then do it once every two or three weeks for preventive purposes.
Face cleansing solution Ingredients: 1 bottle of camphor alcohol extract 1 bottle of hydrogen peroxide 1 bottle of rose water Mix all ingredients together. Crystals may form, but this should not bother you. Use this solution to cleanse your face in the evenings. The solution is especially recommended for skin prone to acne.
Brewer’s yeast Brewer’s yeast can be found in drug stores, in combination with different vitamins. Brewer’s yeast +A, C, E is used for treating vitamin A, C and E deficiency and deficiencies in vitamins of the B group. Brewer’s yeast builds up the immune system and elevates the natural resistance of the body. It has an overall strengthening effect and can help in the healing of some skin problems such as acne. Brewer’s yeast makes the skin smooth and restores its elasticity, while also returning softness and luster to the hair and hardening the nails. It is used during reanimation after heavy workouts or illness. It has a beneficial effect on the development of young bodies, especially during puberty.
After being buried in a load of sand and mud for more than 1,200 years, the ancient Egyptian city of Heracleion is visible once again. Scientists believe the weight of the large buildings over water-logged clay and sand may have caused the city to sink into the Mediterranean Sea after an earthquake. The incredibly-well-preserved artifacts were discovered in 2000 while a team of scientists was conducting an archaeological survey. They were found just 30 feet below the surface after a 13-year-long excavation. Yeah, go figure. Heracleion, which is located in Aboukir Bay, near Alexandria, is believed to have been an important classical-era trade hub and possibly an important religious destination too. [Source]
Found this recipe for edible teacups adorable. These are the perfect dessert treat for a little girl’s party, a tea party, bridal or baby shower. We filled them with chocolate-ricotta cannoli filling, but you could certainly use chocolate pudding if you prefer. Have fun!
Edible Teacups for Fun
Ingredients:
12 sugar ice cream cones 12 peanut butter cups 1/2 cup melting chocolate (like Wilton’s) 12 white Oreos (or other cookies) 6 tiny-twist pretzels chocolate or vanilla pudding or yogurt (to fill)
1. Use a serrated knife to cut off the bottoms of the ice cream cones. Slow and stead wins the race here. Just be gentle and work deliberately. Obviously have some extras on hand in case a few break.
2. To make the handle, use the serrated knife again to cut the tops of the pretzels off. Again, if you break a few, no worries, just eat those and move along.
3. Melt the chocolate according to the package directions. I did mine slowly in the microwave until it was nice and smooth. You could use regular milk chocolate for this recipe, but I found that the melting chocolate (like you get from a craft store) really worked wonders. It melted smoothly and hardened quickly to make this novelty baking project a real breeze. I think regular chocolate would make it a bit more tricky, but certainly do-able.
4. Line up your cookies.
5. Dot each cookie with some chocolate and place a peanut butter cup upside-down on top.
6. Dip the bottom of the cone into the chocolate and set on top of the peanut butter cup.
7. Hold the cone for a few seconds so that the chocolate hardens in place.
8. Look to see if there are any holes or open spaces in your “tea cups” and fill them with chocolate, so that your filling won’t seep out.
9. Attach the handles by dotting chocolate on both ends of the pretzel and holdings it onto the side of the cone until it is set.
10. We found these mini plastic spooAdapns as the Christmas Tree Shop that were perfect!
11. When you are ready to serve, fill the cups with pudding, yogurt, or cannoli filling and enjoy!
Stay tune for more yummy fun recipes ! LOVES ! xox
Shed stubborn pounds fast with this revolutionary new workout plan (no running involved!). Here's something that may be hard to believe: Just because the scale is dipping doesn't mean your fitness routine is working.
If you're logging hours and hours on the treadmill, you've likely seen the numbers on the scale decrease, but you may not be losing body fat. In fact, a 2011 review in the Journal of Obesity found that the effect of regular aerobic exercise on body fat is negligible. Instead, shorter, high-intensity workouts--some that don't even include traditional cardio--have been shown to be more effective at reducing fat than any other type of exercise. These workouts have also been shown to significantly increase your fitness level, lower insulin resistance, and improve glucose tolerance.
Case in point: When comparing the effects on women of high-intensity exercise versus steady-state exercise, one study found that only the high-intensity group had a significant improvement in fat loss after 15 weeks. What's more, there was a significant reduction in fat from their legs (usually a stubborn spot for women) compared with their arms.
That's not to say traditional cardio like running is offlimits--it just shouldn't be your focus if you're trying to shrink your hips and slim your waistline. Rather than having you sweat away for hours, this metabolic workout is designed to get your heart pumping and rev up your metabolism in 30 minutes, max. The surprise: You won't go near a treadmill, bike, or elliptical machine. You'll utilize body-weight strength exercises to torch calories, build lean muscle, and blast more fat.
Think of this routine as a piece of your fitness puzzle: You'll do the moves on the next page once or twice a week in place of your usual cardio workout. (You should also tally three total-body strength sessions--best done in the gym's weight room or with some dumbbells at home--for a total of four or five workouts a week.)
We call this workout "countdowns" at the gym, and it's a favorite--but it's also among the toughest. After a quick warm-up, do five reps of each exercise, moving from one to the next without resting; immediately sprint, jump rope, or run in place for 20 to 40 seconds, then rest for two minutes. Repeat, this time performing four reps of each move; continue the count-down pattern until you've finished the routine doing one rep of each exercise.
The routine is designed so that you do fewer reps as you get more tired, making it possible to finish with the same intensity you had at the beginning. And as you become more fit, you can increase your output: After five workouts, add an extra rep so you're starting with six reps of every exercise. Continue adding an extra rep each time until you've reached 10 reps.
Mix It Up There's more than one way to perform this routine. Vary your weekly program with a timed metabolic workout:
Starting with the first exercise, complete as many reps as you can in 30 seconds, then rest for 30 seconds. Continue this pattern until you've finished all the exercises. That's one circuit. Repeat three more times. The key is to push your intensity during the work period and then completely recover during the rest period before moving on to the next exercise.
1. Squat Thrust
Stand with your feet together and your arms at your sides. Squat down to the floor and place your hands in front of your feet (a). Jump your legs back into a pushup position (b), then quickly reverse the movement and stand to return to start. That's one rep.
2. Prisoner Squat
Stand with your feet shoulder-width apart and place your hands behind your head, elbows out. Keeping your chest up and back flat, push your hips back and bend your knees until your thighs are nearly parallel to the floor (b). Push through your heels to return to start. That's one rep.
3. Prone Hand Touch
Get into a pushup position, your hands shoulder-width apart and your body forming a straight line from head to heels (a). Keeping your body stable and hips parallel to the floor, lift your left hand and touch your right hand (b), then return to start. Repeat with the right hand. That's one rep. Continue alternating.
4. Alternating Kettlebell Clean
Stand with your feet shoulder-width apart, a kettlebell (or dumbbell) sitting between your feet. Push your hips back and bend your knees to lower and grab the weight with your right hand (a). With your back flat and core tight, stand and raise the weight to shoulder height (b). Reverse the move to return to start. Repeat with your left hand. That's one rep. Continue alternating.
5. Alternating Reverse Lunge
Stand with your feet hip-width apart, hands on your hips, chest up, and shoulders back (a). Keeping your upper body still and core tight, take a large step back with your right foot, then bend both knees to lower into a lunge (b). Press through your left heel to return to standing. Repeat, stepping back with your left foot. That's one rep. Continue alternating.
Extra Effort If you have done five workouts--three strength and two metabolic--and want to add a sixth, do a 20-minute intense interval workout using any form of cardio: treadmill, stair climber, hill sprints, stairs, or biking.
The kitchen may be the center of hearth and home, but not everything that happens there is happy. The kitchen, along with the bathroom, is one of the most accident-prone spots in the house.
Here are five dangers that even safety-conscious cooks may overlook:
1. Dishtowels left on the stovetop
Most home fires take place in the kitchen. And it's not always burning food that's at fault. Many fires begin because something has been left on the top of the stove, which is then turned on, either on purpose or by accident (perhaps by a young child or someone with dementia).
Dishcloths and potholders near burners are common fire-triggers. So are dishtowel covering other objects, such as bread rising in a bowl. The Home Safety Council recommends keeping anything flammable at least three feet from the stove.
Related danger: Long-sleeved or wide-sleeved robes, especially those made of flammable synthetics, can easily catch the flames of a gas stove. Many older adults dismiss this danger ("Oh, I've always worn this old robe") without realizing that they may be less attentive than they once were. Paper bags and plastic bags or wrap are other common flammables to handle carefully.
Opposites attract in this week’s most popular looks. Go hard with edgy skulls and chunky chains, but soften up with silky fabrics, deep blues, and gentle curls – and take ‘em home at up to 15% off.
Slow Cooker Lemon Garlic Chicken is one of our favorite easy slow cooker recipes. Pair fresh lemon and garlic with your favorite fresh herbs, and the combination is always delicious. It’s perfect for when the weather warms up and you don’t want to turn on the oven. Slow Cooker Lemon Garlic Chicken is adapted from my popular recipe for Slow Cooker Chicken. Both recipes are so easy to make, and the chicken in incredibly juicy and flavorful.
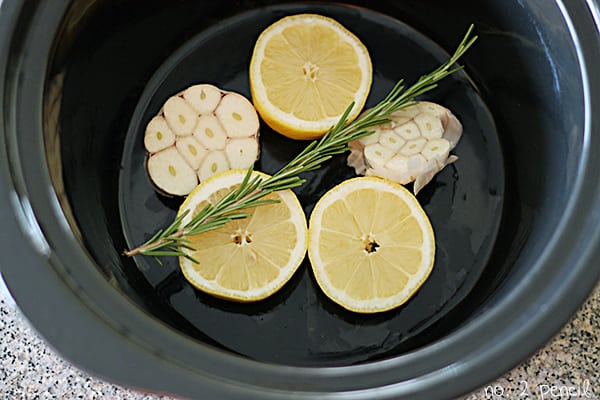
To make lemon garlic chicken in the slow cooker, start by slicing fresh lemons and garlic and laying them in the bottom of the slow cooker. Add any fresh herbs that sound good. I used fresh rosemary, but fresh thyme would be wonderful as well.
When cooking a whole chicken, start by making sure you have removed any extra bits and pieces from inside the chicken. Sometimes the extra pieces, like the neck and such, are in a bag and sometimes they are not. Just make sure you have completely cleaned out the chicken.
Rinse the chicken well and pat it dry with paper towels. Season the chicken inside and out. I like to use an all-purpose steak seasoning because it has so many great chunky spices. Fill the chicken cavity with a quartered lemon, more fresh herbs, and a garlic head cut in half.
Cover the chicken with additional lemon slices and herbs.
Cook on high for about 4 hours, or until chicken reaches 165 degrees. Let chicken rest before carving. Strain juices and serve over chicken.
Slow Cooker Lemon Garlic Chicken
Author: Melissa @ No. 2 Pencil
Recipe type: Dinner
Prep time:
Cook time:
Total time:
Serves: 4
An easy slow cooker recipe for Lemon Garlic Chicken.
Ingredients
4 lemons
2-3 heads of garlic
1 whole chicken 4 to 5 pounds
Fresh rosemary, or any fresh herbs
All-purpose steak seasoning or salt and pepper
Instructions
Cut garlic heads and lemons in half and lay in bottom of slow cooker.
Cut the bottoms off the lemons so they lay flat.
Add a sprig of rosemary, or any herbs.
Remove insides from chicken, rinse chicken and pat dry.
Season chicken well, inside and out, with all-purpose steak seasoning or salt and pepper.
Lay chicken on top of garlic and lemon slices and stuff the chicken with a garlic head cut in half, and a lemon cut in quarters.
Cover top of chicken with additional lemon slices and rosemary.
Turn slow cooker to high, and cook for about 4 hours, or until chicken reaches 165 degrees.
Slow cooker cooking times vary.
Important: Use a meat thermometer to check for doneness.
When chicken has reached 165, turn off slow cooker and let chicken rest for about 15 minutes.
Remove from slow cooker, carve and serve.
Liquid from slow cooker can be strained and served over chicken.
Recipe note: The fresh herbs will cook down in the slow cooker. I used more fresh rosemary on top of the cooked chicken in the last picture.
Thanks Melissa for the recipe !!
Stay tune I'll be back with more recipes ! LOVE xox


")


)")
)")
)")
)")
)")