This video, posted to YouTube by French nurse Sonia Rochel to showcase a new infant bathing technique, is probably the sweetest thing you'll see today. This week. This year. Ever, maybe? The newborn twins won'http://www.youtube.com/watch?v=qY-d46-gPMI&feature=player_embeddedt let go of each other for bath time, probably because they're so used to being together in the womb. Now, get out there and give someone you love a hug. You know you want to.
You’ve only been married for a few years — isn’t it too soon for you and your partner to wear matching tracksuits? The short answer: yes. Here are nine signs that you’re acting like an old married couple. By Andrea Syrtash
Sleep is a magical thing, but those marathon snooze sessions shouldn’t take priority over sex. Making love releases the hormone oxytocin, which promotes feelings of closeness; having sex regularly can help you and your partner feel more connected. Get it?
You head to Costco for date night.
A trip to pick up a 48-pack of toilet paper together isn't exactly a romantic outing, just like crossing items off your to-do list doesn’t equal quality time together. Make your next date night count by doing something fun together, like uncorking a bottle of wine in the park or going to a movie that you’ve both been dying to see.
You start texting your mom -- in the middle of your partner's story.
It may feel like there’s nothing new to learn about
Facial cosmetics are very delicate and can do more harm than good if you do not keep track of their expiration date. Yes, cosmetics have an expiration date, just as medical products do and you should remove them from your cosmetics bag as soon as this date is past.
This sounds simple enough, but there is a problem that many people, especially those who travel a lot, occasionally encounter. The problem is that there are no international standards for marking the expiration date, so the markings are different in Europe and in North America. So here is what you should know about the expiration of makeup:
Makeup expires more quickly in countries or states with a tropical climate.
If you want your cosmetics to last longer, then do not store them in the bathroom where there is moisture. Keep them in a cool dry place, preferably in a zip-lock bag outside the reach of oxygen, and do not use them with wet or dirty hands.
Mascara is a product that you should be extra careful with. Its shelf life is typically anywhere from 3 to 6 months. This is a product based on water, so it is a breeding ground for bacteria, which mean that your mascara can go bad long before its 3 months are up. Avoid sharing cosmetics with your friends, especially mascara.
Ground chicken can make a truly delicious burger when you mix in a few ingredients to add extra flavor and juiciness. For this burger, we used the elements of a traditional sweet and sour chicken. Red and green bell pepper, onion, garlic, rice vinegar and sugar are mixed into the burgers directly, then we topped them with grilled pineapple and a slice of tomato. Serve on toasted sweet rolls with chips and cole slaw on the side.
Ingredients:
1 lb ground chicken
1 to 2 cloves garlic, very finely chopped
1 teaspoon grated fresh ginger
1/3 cup red bell pepper, cut into 1/4-inch pieces
1/3 cup green bell pepper, cut into 1/4-inch pieces
1/4 cup onion, finely chopped
1/2 teaspoon salt
1/2 teaspoon sriracha (Asian hot sauce)
1/2 tablespoon rice vinegar
1/2 tablespoon sugar
4 pineapple rings (fresh or canned)
4 slices tomato
4 sweet sandwich rolls (Hawaiian or potato), toasted
Preparation:
Place the chicken, garlic, ginger, red pepper, green pepper, onion, salt, sriracha, vinegar and sugar in a large bowl. Using your hands, combine the ingredients gently, but thoroughly. The mixture will most likely be quite moist and sticky. Form into four 3/4-inch thick patties, place on a plate and refrigerate for at least 30 minutes.
Meanwhile heat a gas or charcoal grill on high. Oil the grates well and cook the pineapple rings until grill marks form, 2 minutes per side. Transfer to a plate and set aside. Oil the grates again and grill the chicken burgers until no longer pink in the center, 4 to 5 minutes per side. Transfer to a plate and let rest for 5 minutes. Place a slice of tomato on each roll, top with a burger and a slice of grilled pineapple. Serve with chips and coleslaw.
Why: Readers say this is a "must-have" for women with oily skin, because its "high coverage formula covers acne scars, hyperpigmentation, and blemishes" and leaves you with "flawless-looking skin all day." One reader with skin she describes as "an oil slick" says this makeup "lasts even through swimming." Another says, "I have the greasiest face, but this stays put for a long time -- even when I'm super active." Others have dropped their high-end brands for this drugstore foundation since it's "better than any Estee Lauder or Clinique product I've tried."
Lately the term "anti-aging" has been slapped onto everything from sunscreen to face wash to, yes, shampoo. But what does this phrase even mean? Will slapping an as-labeled cream onto your face actually stop the biological process that results in wrinkles, saggy skin, fine lines, discoloration and all the other noticeable things that happen to your epidermis as you get older?
Of course not. No cream will stop the natural process of aging, but that doesn't mean these anti-aging formulas aren't without merit. What the term is really saying is that the product contains ingredients that protect you from "free radicals". These are unstable compounds that screw with your cell's DNA and are found in things as pervasive as food, sunlight, and air as well as in more obvious vices like booze and tobacco. They're also created by our own bodies when we're stressed, don't sleep well, and aren't drinking enough water. In skincare terms, they make you dry, wrinkled, discolored, dull, and saggy — or, simply put, they make you age.
There's two kinds of ingredients that can, at the very least, help slow that down. The first set is antioxidants, best among which are acai oil, green-tea extract, vitamin C, CoEnzyme Q-10, caffeine, and retinol (a form of vitamin A). The second kind of ingredients are plant-based acids like alpha-hydroxy acids, salicylic acid, and hyaluronic acid. Which is best for you? A lot depends on your personal physiology and skin type, so here's where we drop off and suggest chatting up your dermatologist. Until then, drink plenty of water.
Buck up, beta males. While you might think every woman will inevitably fall for the good-looking, unfunny jerk, scientists have determined that there may be hope for the goofy, hopeless romantic. In a study conducted by the Stanford University School of Medicine, researchers found that women have an evolutionary disposition to appreciate humor more than men, making a sense of humor an important element when choosing a suitable mate. Boys and girls between the ages of 6 and 13 were shown funny videos; the female brains showed more heightened activity, which scientists theorize is due to the fact that the female brain and its reward circuit "is biologically better prepared to respond accordingly." Get your ha-ha on, guys. [Source]
Your eyes do not deceive you: That is an adorable, feathery head amongst all that fur. The duckling in the middle of this image was rejected by its duck mother after the baby hurt its foot. Lucky for the duck, Tosia — a cat with an exceptionally generous maternal spirit — was nearby and has adopted the duckling into her brood. Tosia's human owner said she was alerted to the new addition to her household when the cat returned with something in her mouth: "At first I thought it was a mouse or something, but then she placed it on the ground and I saw it was a little duckling." The cats and duckling are now described as "inseparable." [Source]
Grilled pork salad with beets and goat cheese dressing – This salad can be made partially using your grill. It has grilled pork strips, roasted beets, fingerling potatoes, grilled onions, and avocado slices on a bed of lettuce and drizzled with a bell pepper, paprika and goat cheese dressing.
There is nothing better than a well made and filling salad that can equally satisfy your taste buds and your desire to eat something healthy and fresh. This salad combines beets, fingerling potatoes, grilled pork chop strips, grilled white onions and avocado on a bed of lettuce and is drizzled with a flavorful dressing made with bell pepper, paprika, goat cheese and garlic. I found this amazing salad earlier this year on one of my favorite food blogs: El Almuerzo de Leticia and Don Lucho- by the way this is a great site, the food is always appetizing, healthy and the preparation instructions are easy to follow.
This salad is not only a pleasure to eat but it is also beautiful to look at it, I felt like I was creating edible art when I was making it, I made a few substitutions to the salad, you can used grilled pork chop strips, while Don Lucho’s orginal salad had turkey – probably a little bit healthier than pork ;) but essentially you use any meat/poultry/seafood you like –which is great for using up leftovers.I had some fingerling potatoes so I used those but any potatoes can be used.An important part of this salad is the dressing, Don Lucho made a beautiful dressing using a paprika pepper, of course I couldn’t find one so I used a red bell pepper and some smoked paprika powder, I also used goat cheese instead of cream cheese (I just can’t resist combining peppers and goat cheese together), and added some garlic(again goat cheese and garlic are such a great match).
1 red bell pepper, if you can find a fresh red paprika pepper even better
1 tsp smoked paprika powder
2 garlic cloves
½ to ¾ cup milk
4 tbs goat cheese
2 tbs olive oil
Salt to taste
Preparation:
Pre-heat the oven to 350 F.
Wash the beets and remove the leaves, wrap the beets in aluminum foil and bake for about 45-50 minutes, time will vary based on the size of the beets.
When the beets are fully cooked remove them from the oven and place them in bowl of ice to stop the cooking process and cool down.
Peel and cut the beets.
Bring water to boil a large saucepan and boil the potatoes for about 8-10 minutes or until tender, remove from heat and let cool down, use them either whole or quartered.
Meanwhile combine the bell pepper, smoked paprika, garlic, milk, goat cheese, olive oil, and salt in the blender and blend until you get a smooth sauce, strain it and refrigerate until ready to use.
Season the pork and onions with the olive oil, salt and pepper
Grill or sauté the pork and onions, let them cool down before using.
Arrange the lettuce, beets, potatoes, onions, pork and avocados in a salad bowl, platter or individual plates, drizzle with the salad dressing and serve immediately.
As the recent heat wave intensifies, it’s important to remember that rising temperatures can be more than just uncomfortable. This record-breaking weather can be dangerous--even deadly. Staying cool is a priority, so here are ten ways to combat the sizzling heat.
1. Chill your wrists: Chris Baskind of the Mother Nature Network suggests running cold water over wrists for a minute every hour:
“When you were sick as a child, your mom may have brought you a cold facecloth. This idea works the same way.”
2. Stay hydrated: Kids may not feel thirsty, but it’s essential to stay hydrated, so make sure young ones are getting lots of H20. If you’re planning to leave the house, freeze some water bottles and take them with you.
3. A little help from some fans: They may be little, but those battery-operated personal fans can make a big difference.
4. Frozen washcloth: Freeze a washcloth and then plop it on the back of their necks—instant refresher.
5. Turn off electronics: If they’re not being used, unplug electronics to keep them from generating unnecessary heat.
6. Stay downstairs: Downstairs areastend to be cooler. Herd kids into an air-conditioned basement, if available. If not, stay on the first floor.
7. Don’t cook: Feed kids fresh foods like salads and fruit. Not only will this cool the core, it’ll also keep cooking-related heat from filling up the house.
8. Plan ahead: If you’re leaving the house, make sure you won’t be spending too much time in areas without shade. Bring plenty of water and dress in lightweight, light-colored clothing.
9. Precool: Lifehacker recommends “precooling” to counter overheating:
“Before you start exercising, you can use a couple precooling techniques to keep your temperature down. This includes drinking a slushie, or even just draping a cold rag around your neck. These precooling techniques can improve endurance in hot weather exercise by nearly 4 percent.”
10. Postpone laundry: Plan to do heat-generating activities after the sun goes down. Do laundry at night, for example.
I am so looking forward to summer, can’t wait for picnics and BBQs, eating dinner outside, hiking, farmer’s market at their peak, cooking with the kids and all those fun summer activities. We eat salads year round, but some of the best salads are the summer ones. The selection of vegetables and fruits during the summer is amazing, it’s impossible to take a trip to the farmer’s market and not be inspired to use the ingredients to prepare something delicious. These salad recipes are some of my favorite summer salads. You can make these salads year-round, but they taste even better during the summer. Here's the list of ten salads but today I'm going to show you how to make "Mango avocado salad " :)
1) Mango avocado salad – Arugula salad with mango, avocado and red onions tossed with spicy orange vinaigrette. This salad is great on its own or can also be enhanced by adding grilled shrimp or grilled chicken (or grilled anything). 2) Grilled pork salad with beets and goat cheese dressing – This salad can be made partially
Mix two egg whites with half of a mashed-up avocado; leave it in hair for 15 minutes, then wash and condition. It's a fast and inexpensive natural remedy that leaves hair super-smooth ;)
Pimples can be successfully removed at home. In order to achieve this, you will have to be consistent in your facial care. Below you will find some masks recommended for dealing with pimples.
The yeast mask Mix fresh live yeast the amount of a walnut with two tablespoons of whole milk. Blend until a paste forms and spread it on your face. Keep the paste on for 20 minutes and remove it with a cotton ball dipped in chamomile brew. Do not wash your face with water for at least two hours after the procedure. Do this mask once a week for a month and then do it once every two or three weeks for preventive purposes.
Face cleansing solution Ingredients: 1 bottle of camphor alcohol extract 1 bottle of hydrogen peroxide 1 bottle of rose water Mix all ingredients together. Crystals may form, but this should not bother you. Use this solution to cleanse your face in the evenings. The solution is especially recommended for skin prone to acne.
Brewer’s yeast Brewer’s yeast can be found in drug stores, in combination with different vitamins. Brewer’s yeast +A, C, E is used for treating vitamin A, C and E deficiency and deficiencies in vitamins of the B group. Brewer’s yeast builds up the immune system and elevates the natural resistance of the body. It has an overall strengthening effect and can help in the healing of some skin problems such as acne. Brewer’s yeast makes the skin smooth and restores its elasticity, while also returning softness and luster to the hair and hardening the nails. It is used during reanimation after heavy workouts or illness. It has a beneficial effect on the development of young bodies, especially during puberty.
After being buried in a load of sand and mud for more than 1,200 years, the ancient Egyptian city of Heracleion is visible once again. Scientists believe the weight of the large buildings over water-logged clay and sand may have caused the city to sink into the Mediterranean Sea after an earthquake. The incredibly-well-preserved artifacts were discovered in 2000 while a team of scientists was conducting an archaeological survey. They were found just 30 feet below the surface after a 13-year-long excavation. Yeah, go figure. Heracleion, which is located in Aboukir Bay, near Alexandria, is believed to have been an important classical-era trade hub and possibly an important religious destination too. [Source]
Found this recipe for edible teacups adorable. These are the perfect dessert treat for a little girl’s party, a tea party, bridal or baby shower. We filled them with chocolate-ricotta cannoli filling, but you could certainly use chocolate pudding if you prefer. Have fun!
Edible Teacups for Fun
Ingredients:
12 sugar ice cream cones 12 peanut butter cups 1/2 cup melting chocolate (like Wilton’s) 12 white Oreos (or other cookies) 6 tiny-twist pretzels chocolate or vanilla pudding or yogurt (to fill)
1. Use a serrated knife to cut off the bottoms of the ice cream cones. Slow and stead wins the race here. Just be gentle and work deliberately. Obviously have some extras on hand in case a few break.
2. To make the handle, use the serrated knife again to cut the tops of the pretzels off. Again, if you break a few, no worries, just eat those and move along.
3. Melt the chocolate according to the package directions. I did mine slowly in the microwave until it was nice and smooth. You could use regular milk chocolate for this recipe, but I found that the melting chocolate (like you get from a craft store) really worked wonders. It melted smoothly and hardened quickly to make this novelty baking project a real breeze. I think regular chocolate would make it a bit more tricky, but certainly do-able.
4. Line up your cookies.
5. Dot each cookie with some chocolate and place a peanut butter cup upside-down on top.
6. Dip the bottom of the cone into the chocolate and set on top of the peanut butter cup.
7. Hold the cone for a few seconds so that the chocolate hardens in place.
8. Look to see if there are any holes or open spaces in your “tea cups” and fill them with chocolate, so that your filling won’t seep out.
9. Attach the handles by dotting chocolate on both ends of the pretzel and holdings it onto the side of the cone until it is set.
10. We found these mini plastic spooAdapns as the Christmas Tree Shop that were perfect!
11. When you are ready to serve, fill the cups with pudding, yogurt, or cannoli filling and enjoy!
Stay tune for more yummy fun recipes ! LOVES ! xox
Shed stubborn pounds fast with this revolutionary new workout plan (no running involved!). Here's something that may be hard to believe: Just because the scale is dipping doesn't mean your fitness routine is working.
If you're logging hours and hours on the treadmill, you've likely seen the numbers on the scale decrease, but you may not be losing body fat. In fact, a 2011 review in the Journal of Obesity found that the effect of regular aerobic exercise on body fat is negligible. Instead, shorter, high-intensity workouts--some that don't even include traditional cardio--have been shown to be more effective at reducing fat than any other type of exercise. These workouts have also been shown to significantly increase your fitness level, lower insulin resistance, and improve glucose tolerance.
Case in point: When comparing the effects on women of high-intensity exercise versus steady-state exercise, one study found that only the high-intensity group had a significant improvement in fat loss after 15 weeks. What's more, there was a significant reduction in fat from their legs (usually a stubborn spot for women) compared with their arms.
That's not to say traditional cardio like running is offlimits--it just shouldn't be your focus if you're trying to shrink your hips and slim your waistline. Rather than having you sweat away for hours, this metabolic workout is designed to get your heart pumping and rev up your metabolism in 30 minutes, max. The surprise: You won't go near a treadmill, bike, or elliptical machine. You'll utilize body-weight strength exercises to torch calories, build lean muscle, and blast more fat.
Think of this routine as a piece of your fitness puzzle: You'll do the moves on the next page once or twice a week in place of your usual cardio workout. (You should also tally three total-body strength sessions--best done in the gym's weight room or with some dumbbells at home--for a total of four or five workouts a week.)
We call this workout "countdowns" at the gym, and it's a favorite--but it's also among the toughest. After a quick warm-up, do five reps of each exercise, moving from one to the next without resting; immediately sprint, jump rope, or run in place for 20 to 40 seconds, then rest for two minutes. Repeat, this time performing four reps of each move; continue the count-down pattern until you've finished the routine doing one rep of each exercise.
The routine is designed so that you do fewer reps as you get more tired, making it possible to finish with the same intensity you had at the beginning. And as you become more fit, you can increase your output: After five workouts, add an extra rep so you're starting with six reps of every exercise. Continue adding an extra rep each time until you've reached 10 reps.
Mix It Up There's more than one way to perform this routine. Vary your weekly program with a timed metabolic workout:
Starting with the first exercise, complete as many reps as you can in 30 seconds, then rest for 30 seconds. Continue this pattern until you've finished all the exercises. That's one circuit. Repeat three more times. The key is to push your intensity during the work period and then completely recover during the rest period before moving on to the next exercise.
1. Squat Thrust
Stand with your feet together and your arms at your sides. Squat down to the floor and place your hands in front of your feet (a). Jump your legs back into a pushup position (b), then quickly reverse the movement and stand to return to start. That's one rep.
2. Prisoner Squat
Stand with your feet shoulder-width apart and place your hands behind your head, elbows out. Keeping your chest up and back flat, push your hips back and bend your knees until your thighs are nearly parallel to the floor (b). Push through your heels to return to start. That's one rep.
3. Prone Hand Touch
Get into a pushup position, your hands shoulder-width apart and your body forming a straight line from head to heels (a). Keeping your body stable and hips parallel to the floor, lift your left hand and touch your right hand (b), then return to start. Repeat with the right hand. That's one rep. Continue alternating.
4. Alternating Kettlebell Clean
Stand with your feet shoulder-width apart, a kettlebell (or dumbbell) sitting between your feet. Push your hips back and bend your knees to lower and grab the weight with your right hand (a). With your back flat and core tight, stand and raise the weight to shoulder height (b). Reverse the move to return to start. Repeat with your left hand. That's one rep. Continue alternating.
5. Alternating Reverse Lunge
Stand with your feet hip-width apart, hands on your hips, chest up, and shoulders back (a). Keeping your upper body still and core tight, take a large step back with your right foot, then bend both knees to lower into a lunge (b). Press through your left heel to return to standing. Repeat, stepping back with your left foot. That's one rep. Continue alternating.
Extra Effort If you have done five workouts--three strength and two metabolic--and want to add a sixth, do a 20-minute intense interval workout using any form of cardio: treadmill, stair climber, hill sprints, stairs, or biking.
The kitchen may be the center of hearth and home, but not everything that happens there is happy. The kitchen, along with the bathroom, is one of the most accident-prone spots in the house.
Here are five dangers that even safety-conscious cooks may overlook:
1. Dishtowels left on the stovetop
Most home fires take place in the kitchen. And it's not always burning food that's at fault. Many fires begin because something has been left on the top of the stove, which is then turned on, either on purpose or by accident (perhaps by a young child or someone with dementia).
Dishcloths and potholders near burners are common fire-triggers. So are dishtowel covering other objects, such as bread rising in a bowl. The Home Safety Council recommends keeping anything flammable at least three feet from the stove.
Related danger: Long-sleeved or wide-sleeved robes, especially those made of flammable synthetics, can easily catch the flames of a gas stove. Many older adults dismiss this danger ("Oh, I've always worn this old robe") without realizing that they may be less attentive than they once were. Paper bags and plastic bags or wrap are other common flammables to handle carefully.
Opposites attract in this week’s most popular looks. Go hard with edgy skulls and chunky chains, but soften up with silky fabrics, deep blues, and gentle curls – and take ‘em home at up to 15% off.
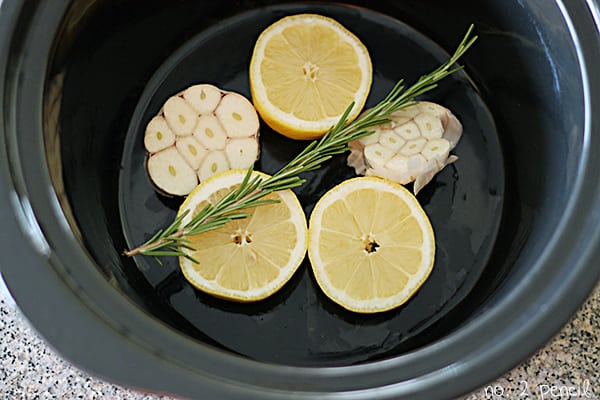
Slow Cooker Lemon Garlic Chicken is one of our favorite easy slow cooker recipes. Pair fresh lemon and garlic with your favorite fresh herbs, and the combination is always delicious. It’s perfect for when the weather warms up and you don’t want to turn on the oven. Slow Cooker Lemon Garlic Chicken is adapted from my popular recipe for Slow Cooker Chicken. Both recipes are so easy to make, and the chicken in incredibly juicy and flavorful.
To make lemon garlic chicken in the slow cooker, start by slicing fresh lemons and garlic and laying them in the bottom of the slow cooker. Add any fresh herbs that sound good. I used fresh rosemary, but fresh thyme would be wonderful as well.
When cooking a whole chicken, start by making sure you have removed any extra bits and pieces from inside the chicken. Sometimes the extra pieces, like the neck and such, are in a bag and sometimes they are not. Just make sure you have completely cleaned out the chicken.
Rinse the chicken well and pat it dry with paper towels. Season the chicken inside and out. I like to use an all-purpose steak seasoning because it has so many great chunky spices. Fill the chicken cavity with a quartered lemon, more fresh herbs, and a garlic head cut in half.
Cover the chicken with additional lemon slices and herbs.
Cook on high for about 4 hours, or until chicken reaches 165 degrees. Let chicken rest before carving. Strain juices and serve over chicken.
Slow Cooker Lemon Garlic Chicken
Author: Melissa @ No. 2 Pencil
Recipe type: Dinner
Prep time:
Cook time:
Total time:
Serves: 4
An easy slow cooker recipe for Lemon Garlic Chicken.
Ingredients
4 lemons
2-3 heads of garlic
1 whole chicken 4 to 5 pounds
Fresh rosemary, or any fresh herbs
All-purpose steak seasoning or salt and pepper
Instructions
Cut garlic heads and lemons in half and lay in bottom of slow cooker.
Cut the bottoms off the lemons so they lay flat.
Add a sprig of rosemary, or any herbs.
Remove insides from chicken, rinse chicken and pat dry.
Season chicken well, inside and out, with all-purpose steak seasoning or salt and pepper.
Lay chicken on top of garlic and lemon slices and stuff the chicken with a garlic head cut in half, and a lemon cut in quarters.
Cover top of chicken with additional lemon slices and rosemary.
Turn slow cooker to high, and cook for about 4 hours, or until chicken reaches 165 degrees.
Slow cooker cooking times vary.
Important: Use a meat thermometer to check for doneness.
When chicken has reached 165, turn off slow cooker and let chicken rest for about 15 minutes.
Remove from slow cooker, carve and serve.
Liquid from slow cooker can be strained and served over chicken.
Recipe note: The fresh herbs will cook down in the slow cooker. I used more fresh rosemary on top of the cooked chicken in the last picture.
Thanks Melissa for the recipe !!
Stay tune I'll be back with more recipes ! LOVE xox
Hi Beautiful Ones! I hope your long Memorial weekend is going great so far. Yesterday was not such a great day for me. I turned on my computer and was preparing to update my blog and the whole thing was gone. My whole blog got deleted by blogger with no explanation and no forewarning. I was mortified and spent a very frustrating day trying to get it restored. Can you imagine waking up one day and your whole blog is gone and you have to start over with nothing? I am so glad that everything worked out. That taught me a very valuable lesson about how important it is to back everything up.
Wooooooh! now that the blogger folks have taken care of that fiasco yesterday. Lets Cook! This recipe is for lemon garlic chicken wings. I thought this would be a refreshing change from the buffalo wings most of us are used to. This is an easy recipe and if you don't have wings, you can do this with regular chicken as well.
I must warn you that they are saucy and delicious and we all know that there is just not a cute way to eat a chicken wing...LOL
Ingredients
2 1/2 pounds chicken wings
3 cloves garlic, crushed
1 teaspoon onion powder
2 teaspoons Italian seasoning
1 teaspoon sugar
3 tablespoons fresh rosemary leaves stripped from stems
3 tablespoons extra-virgin olive oil
1 lemon, zested and juiced
1 tablespoon grill seasoning blend (recommended: Montreal Seasoning) or, coarse salt and black pepper
1/2 cup dry white wine or chicken broth
Directions
Preheat oven to 450 degrees F.
Generously coat wings with olive oil and then combine dry seasonings and coat chicken wings with seasoning. Let marinate for 30 minutes (overnight is even better)
Spray baking sheet with vegetable cooking spray or lightly oil the pan with canola oil. Arrange wings in a single layer on a baking sheet and roast for 30 minutes. Turn wings over and roast another ten minutes. While wings are roasting combine lemon juice and wine or broth and Roast another 5 minutes to blend the flavors.
Stay tune and I'll back with more recipes ! Loves xox
Pad Thai is one of those dishes with multiple dimensions of flavor. Chock full of spices, vegetables, noodles, what's not to love? I always order this when I go out for Thai food, but I wanted to switch it up and make it myself. I had all of the ingredients on hand except for the noodles, which I purchased in the Asian section of the grocery store. This dish is very filling and bursting with flavor and texture! It takes a little time to prepare this dish, but I promise it will be time well spent. When those delicious aromas start floating around the neighborhood, you might have a few new friends after you make this dish:-)
Just the hint before jumps to cooking : Garlic adds delicious flavor and has lots of great health benefits too :) Bean Sprouts add lots of crunchy texture. Lime adds a refreshing burst of flavor . Cilantro is the perfect topping for this dish! A hint of chopped peanuts on top makes this extra special. I love this with Shrimp and Chicken, but you can easily make this a vegetarian dish by omitting the shrimp and chicken or you can substitute with Tofu. Ok, lets make Pad Thai!
Ingredients
1 (8 ounce) package dried flat rice noodles
3 tablespoons fish sauce
1/4 cup fresh lime juice
1 tablespoon brown sugar
2 tablespoons fish sauce
1 1/2 tablespoons Asian chili pepper sauce, divided
1/4 cup chicken stock
1/4 cup vegetable oil
1 tablespoon chopped garlic
8 ounces medium shrimp - peeled and deveined
8 ounces skinless, boneless chicken breast halves - cut into 1 inch cubes
Fill a large bowl with hot tap water and place the noodles in it to soak for 20 minutes.
In a small bowl, stir together the fish sauce, lime juice, sugar, oyster sauce, 2 teaspoons of the chili sauce and chicken stock. Set aside.
Heat a wok or large skillet over high heat and add vegetable oil. When the oil is hot, stir in garlic and cook for about 10 seconds. Add shrimp and chicken; cook, stirring constantly until shrimp is opaque and chicken is cooked through, 5 to 7 minutes.
Move everything in the wok out to the sides and pour the eggs in the center. Cook and stir the eggs until firm. Add the noodles to the wok and pour in the sauce. Cook, stirring constantly, until the noodles are tender. Add a bit more water if needed to finish cooking the noodles. Stir in 3 cups of bean sprouts and green onions. Remove from the heat and garnish with chopped peanuts. Taste for seasoning, adjusting the spice or lime juice if needed.
Serve garnished with fresh cilantro and remaining bean sprouts and lime wedges on the side.
Stay tune I'll be back with more recipes ! Loves xox
Dreaming of those far-off summer days? The golden warmth, the sunset hues, the cool glimmer of poolside sparkle … Ah, but who said you had to wait? Get the drop on summer in this week’s top picks with twinkling gems, sunbursts, and more! Click here


")
")


")


)")
)")
)")
)")
)")