After being buried in a load of sand and mud for more than 1,200 years, the ancient Egyptian city of Heracleion is visible once again. Scientists believe the weight of the large buildings over water-logged clay and sand may have caused the city to sink into the Mediterranean Sea after an earthquake. The incredibly-well-preserved artifacts were discovered in 2000 while a team of scientists was conducting an archaeological survey. They were found just 30 feet below the surface after a 13-year-long excavation. Yeah, go figure. Heracleion, which is located in Aboukir Bay, near Alexandria, is believed to have been an important classical-era trade hub and possibly an important religious destination too. [Source]
Found this recipe for edible teacups adorable. These are the perfect dessert treat for a little girl’s party, a tea party, bridal or baby shower. We filled them with chocolate-ricotta cannoli filling, but you could certainly use chocolate pudding if you prefer. Have fun!
Edible Teacups for Fun
Ingredients:
12 sugar ice cream cones 12 peanut butter cups 1/2 cup melting chocolate (like Wilton’s) 12 white Oreos (or other cookies) 6 tiny-twist pretzels chocolate or vanilla pudding or yogurt (to fill)
1. Use a serrated knife to cut off the bottoms of the ice cream cones. Slow and stead wins the race here. Just be gentle and work deliberately. Obviously have some extras on hand in case a few break.
2. To make the handle, use the serrated knife again to cut the tops of the pretzels off. Again, if you break a few, no worries, just eat those and move along.
3. Melt the chocolate according to the package directions. I did mine slowly in the microwave until it was nice and smooth. You could use regular milk chocolate for this recipe, but I found that the melting chocolate (like you get from a craft store) really worked wonders. It melted smoothly and hardened quickly to make this novelty baking project a real breeze. I think regular chocolate would make it a bit more tricky, but certainly do-able.
4. Line up your cookies.
5. Dot each cookie with some chocolate and place a peanut butter cup upside-down on top.
6. Dip the bottom of the cone into the chocolate and set on top of the peanut butter cup.
7. Hold the cone for a few seconds so that the chocolate hardens in place.
8. Look to see if there are any holes or open spaces in your “tea cups” and fill them with chocolate, so that your filling won’t seep out.
9. Attach the handles by dotting chocolate on both ends of the pretzel and holdings it onto the side of the cone until it is set.
10. We found these mini plastic spooAdapns as the Christmas Tree Shop that were perfect!
11. When you are ready to serve, fill the cups with pudding, yogurt, or cannoli filling and enjoy!
Stay tune for more yummy fun recipes ! LOVES ! xox
Shed stubborn pounds fast with this revolutionary new workout plan (no running involved!). Here's something that may be hard to believe: Just because the scale is dipping doesn't mean your fitness routine is working.
If you're logging hours and hours on the treadmill, you've likely seen the numbers on the scale decrease, but you may not be losing body fat. In fact, a 2011 review in the Journal of Obesity found that the effect of regular aerobic exercise on body fat is negligible. Instead, shorter, high-intensity workouts--some that don't even include traditional cardio--have been shown to be more effective at reducing fat than any other type of exercise. These workouts have also been shown to significantly increase your fitness level, lower insulin resistance, and improve glucose tolerance.
Case in point: When comparing the effects on women of high-intensity exercise versus steady-state exercise, one study found that only the high-intensity group had a significant improvement in fat loss after 15 weeks. What's more, there was a significant reduction in fat from their legs (usually a stubborn spot for women) compared with their arms.
That's not to say traditional cardio like running is offlimits--it just shouldn't be your focus if you're trying to shrink your hips and slim your waistline. Rather than having you sweat away for hours, this metabolic workout is designed to get your heart pumping and rev up your metabolism in 30 minutes, max. The surprise: You won't go near a treadmill, bike, or elliptical machine. You'll utilize body-weight strength exercises to torch calories, build lean muscle, and blast more fat.
Think of this routine as a piece of your fitness puzzle: You'll do the moves on the next page once or twice a week in place of your usual cardio workout. (You should also tally three total-body strength sessions--best done in the gym's weight room or with some dumbbells at home--for a total of four or five workouts a week.)
We call this workout "countdowns" at the gym, and it's a favorite--but it's also among the toughest. After a quick warm-up, do five reps of each exercise, moving from one to the next without resting; immediately sprint, jump rope, or run in place for 20 to 40 seconds, then rest for two minutes. Repeat, this time performing four reps of each move; continue the count-down pattern until you've finished the routine doing one rep of each exercise.
The routine is designed so that you do fewer reps as you get more tired, making it possible to finish with the same intensity you had at the beginning. And as you become more fit, you can increase your output: After five workouts, add an extra rep so you're starting with six reps of every exercise. Continue adding an extra rep each time until you've reached 10 reps.
Mix It Up There's more than one way to perform this routine. Vary your weekly program with a timed metabolic workout:
Starting with the first exercise, complete as many reps as you can in 30 seconds, then rest for 30 seconds. Continue this pattern until you've finished all the exercises. That's one circuit. Repeat three more times. The key is to push your intensity during the work period and then completely recover during the rest period before moving on to the next exercise.
1. Squat Thrust
Stand with your feet together and your arms at your sides. Squat down to the floor and place your hands in front of your feet (a). Jump your legs back into a pushup position (b), then quickly reverse the movement and stand to return to start. That's one rep.
2. Prisoner Squat
Stand with your feet shoulder-width apart and place your hands behind your head, elbows out. Keeping your chest up and back flat, push your hips back and bend your knees until your thighs are nearly parallel to the floor (b). Push through your heels to return to start. That's one rep.
3. Prone Hand Touch
Get into a pushup position, your hands shoulder-width apart and your body forming a straight line from head to heels (a). Keeping your body stable and hips parallel to the floor, lift your left hand and touch your right hand (b), then return to start. Repeat with the right hand. That's one rep. Continue alternating.
4. Alternating Kettlebell Clean
Stand with your feet shoulder-width apart, a kettlebell (or dumbbell) sitting between your feet. Push your hips back and bend your knees to lower and grab the weight with your right hand (a). With your back flat and core tight, stand and raise the weight to shoulder height (b). Reverse the move to return to start. Repeat with your left hand. That's one rep. Continue alternating.
5. Alternating Reverse Lunge
Stand with your feet hip-width apart, hands on your hips, chest up, and shoulders back (a). Keeping your upper body still and core tight, take a large step back with your right foot, then bend both knees to lower into a lunge (b). Press through your left heel to return to standing. Repeat, stepping back with your left foot. That's one rep. Continue alternating.
Extra Effort If you have done five workouts--three strength and two metabolic--and want to add a sixth, do a 20-minute intense interval workout using any form of cardio: treadmill, stair climber, hill sprints, stairs, or biking.
The kitchen may be the center of hearth and home, but not everything that happens there is happy. The kitchen, along with the bathroom, is one of the most accident-prone spots in the house.
Here are five dangers that even safety-conscious cooks may overlook:
1. Dishtowels left on the stovetop
Most home fires take place in the kitchen. And it's not always burning food that's at fault. Many fires begin because something has been left on the top of the stove, which is then turned on, either on purpose or by accident (perhaps by a young child or someone with dementia).
Dishcloths and potholders near burners are common fire-triggers. So are dishtowel covering other objects, such as bread rising in a bowl. The Home Safety Council recommends keeping anything flammable at least three feet from the stove.
Related danger: Long-sleeved or wide-sleeved robes, especially those made of flammable synthetics, can easily catch the flames of a gas stove. Many older adults dismiss this danger ("Oh, I've always worn this old robe") without realizing that they may be less attentive than they once were. Paper bags and plastic bags or wrap are other common flammables to handle carefully.
Opposites attract in this week’s most popular looks. Go hard with edgy skulls and chunky chains, but soften up with silky fabrics, deep blues, and gentle curls – and take ‘em home at up to 15% off.
Slow Cooker Lemon Garlic Chicken is one of our favorite easy slow cooker recipes. Pair fresh lemon and garlic with your favorite fresh herbs, and the combination is always delicious. It’s perfect for when the weather warms up and you don’t want to turn on the oven. Slow Cooker Lemon Garlic Chicken is adapted from my popular recipe for Slow Cooker Chicken. Both recipes are so easy to make, and the chicken in incredibly juicy and flavorful.
To make lemon garlic chicken in the slow cooker, start by slicing fresh lemons and garlic and laying them in the bottom of the slow cooker. Add any fresh herbs that sound good. I used fresh rosemary, but fresh thyme would be wonderful as well.
When cooking a whole chicken, start by making sure you have removed any extra bits and pieces from inside the chicken. Sometimes the extra pieces, like the neck and such, are in a bag and sometimes they are not. Just make sure you have completely cleaned out the chicken.
Rinse the chicken well and pat it dry with paper towels. Season the chicken inside and out. I like to use an all-purpose steak seasoning because it has so many great chunky spices. Fill the chicken cavity with a quartered lemon, more fresh herbs, and a garlic head cut in half.
Cover the chicken with additional lemon slices and herbs.
Cook on high for about 4 hours, or until chicken reaches 165 degrees. Let chicken rest before carving. Strain juices and serve over chicken.
Slow Cooker Lemon Garlic Chicken
Author: Melissa @ No. 2 Pencil
Recipe type: Dinner
Prep time:
Cook time:
Total time:
Serves: 4
An easy slow cooker recipe for Lemon Garlic Chicken.
Ingredients
4 lemons
2-3 heads of garlic
1 whole chicken 4 to 5 pounds
Fresh rosemary, or any fresh herbs
All-purpose steak seasoning or salt and pepper
Instructions
Cut garlic heads and lemons in half and lay in bottom of slow cooker.
Cut the bottoms off the lemons so they lay flat.
Add a sprig of rosemary, or any herbs.
Remove insides from chicken, rinse chicken and pat dry.
Season chicken well, inside and out, with all-purpose steak seasoning or salt and pepper.
Lay chicken on top of garlic and lemon slices and stuff the chicken with a garlic head cut in half, and a lemon cut in quarters.
Cover top of chicken with additional lemon slices and rosemary.
Turn slow cooker to high, and cook for about 4 hours, or until chicken reaches 165 degrees.
Slow cooker cooking times vary.
Important: Use a meat thermometer to check for doneness.
When chicken has reached 165, turn off slow cooker and let chicken rest for about 15 minutes.
Remove from slow cooker, carve and serve.
Liquid from slow cooker can be strained and served over chicken.
Recipe note: The fresh herbs will cook down in the slow cooker. I used more fresh rosemary on top of the cooked chicken in the last picture.
Thanks Melissa for the recipe !!
Stay tune I'll be back with more recipes ! LOVE xox
Hi Beautiful Ones! I hope your long Memorial weekend is going great so far. Yesterday was not such a great day for me. I turned on my computer and was preparing to update my blog and the whole thing was gone. My whole blog got deleted by blogger with no explanation and no forewarning. I was mortified and spent a very frustrating day trying to get it restored. Can you imagine waking up one day and your whole blog is gone and you have to start over with nothing? I am so glad that everything worked out. That taught me a very valuable lesson about how important it is to back everything up.
Wooooooh! now that the blogger folks have taken care of that fiasco yesterday. Lets Cook! This recipe is for lemon garlic chicken wings. I thought this would be a refreshing change from the buffalo wings most of us are used to. This is an easy recipe and if you don't have wings, you can do this with regular chicken as well.
I must warn you that they are saucy and delicious and we all know that there is just not a cute way to eat a chicken wing...LOL
Ingredients
2 1/2 pounds chicken wings
3 cloves garlic, crushed
1 teaspoon onion powder
2 teaspoons Italian seasoning
1 teaspoon sugar
3 tablespoons fresh rosemary leaves stripped from stems
3 tablespoons extra-virgin olive oil
1 lemon, zested and juiced
1 tablespoon grill seasoning blend (recommended: Montreal Seasoning) or, coarse salt and black pepper
1/2 cup dry white wine or chicken broth
Directions
Preheat oven to 450 degrees F.
Generously coat wings with olive oil and then combine dry seasonings and coat chicken wings with seasoning. Let marinate for 30 minutes (overnight is even better)
Spray baking sheet with vegetable cooking spray or lightly oil the pan with canola oil. Arrange wings in a single layer on a baking sheet and roast for 30 minutes. Turn wings over and roast another ten minutes. While wings are roasting combine lemon juice and wine or broth and Roast another 5 minutes to blend the flavors.
Stay tune and I'll back with more recipes ! Loves xox
Pad Thai is one of those dishes with multiple dimensions of flavor. Chock full of spices, vegetables, noodles, what's not to love? I always order this when I go out for Thai food, but I wanted to switch it up and make it myself. I had all of the ingredients on hand except for the noodles, which I purchased in the Asian section of the grocery store. This dish is very filling and bursting with flavor and texture! It takes a little time to prepare this dish, but I promise it will be time well spent. When those delicious aromas start floating around the neighborhood, you might have a few new friends after you make this dish:-)
Just the hint before jumps to cooking : Garlic adds delicious flavor and has lots of great health benefits too :) Bean Sprouts add lots of crunchy texture. Lime adds a refreshing burst of flavor . Cilantro is the perfect topping for this dish! A hint of chopped peanuts on top makes this extra special. I love this with Shrimp and Chicken, but you can easily make this a vegetarian dish by omitting the shrimp and chicken or you can substitute with Tofu. Ok, lets make Pad Thai!
Ingredients
1 (8 ounce) package dried flat rice noodles
3 tablespoons fish sauce
1/4 cup fresh lime juice
1 tablespoon brown sugar
2 tablespoons fish sauce
1 1/2 tablespoons Asian chili pepper sauce, divided
1/4 cup chicken stock
1/4 cup vegetable oil
1 tablespoon chopped garlic
8 ounces medium shrimp - peeled and deveined
8 ounces skinless, boneless chicken breast halves - cut into 1 inch cubes
Fill a large bowl with hot tap water and place the noodles in it to soak for 20 minutes.
In a small bowl, stir together the fish sauce, lime juice, sugar, oyster sauce, 2 teaspoons of the chili sauce and chicken stock. Set aside.
Heat a wok or large skillet over high heat and add vegetable oil. When the oil is hot, stir in garlic and cook for about 10 seconds. Add shrimp and chicken; cook, stirring constantly until shrimp is opaque and chicken is cooked through, 5 to 7 minutes.
Move everything in the wok out to the sides and pour the eggs in the center. Cook and stir the eggs until firm. Add the noodles to the wok and pour in the sauce. Cook, stirring constantly, until the noodles are tender. Add a bit more water if needed to finish cooking the noodles. Stir in 3 cups of bean sprouts and green onions. Remove from the heat and garnish with chopped peanuts. Taste for seasoning, adjusting the spice or lime juice if needed.
Serve garnished with fresh cilantro and remaining bean sprouts and lime wedges on the side.
Stay tune I'll be back with more recipes ! Loves xox
Dreaming of those far-off summer days? The golden warmth, the sunset hues, the cool glimmer of poolside sparkle … Ah, but who said you had to wait? Get the drop on summer in this week’s top picks with twinkling gems, sunbursts, and more! Click here
Hollywood is working hard to get our butts into movie-theater seats this summer—and with a roster like this, it’s not going to be too difficult. Whether you want blockbusters featuring Superman or super man Will Smith, some of the best indie hits out of Sundance, or a hilarious lady comedy, there’s a movie for you. Right this way for insanely good entertainment.
After Earth (May 31)
This M. Night Shyamalan movie made the cut because of four words: Will and Jaden Smith. Take Pursuit of Happyness, add 10 years, scary monsters, and a father and son kicking butt together instead of solving Rubik’s Cubes, and Shyamalan may finally have a hit on his hands that doesn’t involve seeing dead people.
Much Ado About Nothing (June 7)
The Shakespeare rom-com is back, and this time it’s reimagined in modern day by The Avengers and Buffy the Vampire Slayer genius Joss Whedon.
This Is the End (June 12)
There have been a lot of movies about the end of the world lately, and most have been
Bring on the prints and slap on some black as a chic finishing touch.
Don’t put away your stockings just yet.
A blazer and tights take that new, favorite summer dress into buy-now-wear-immediately territory during the cooler spring months.
Test-drive overalls
Overalls are the perfect piece to wear with warm sweaters or crop T-shirts and a leather jacket. They’re completely versatile and great for transitioning between seasons
Foundation is the most important part of makeup, the base on which all else is built. If you mess up this part of your make up the rest of it will look odd, no matter how expertly it is done. Here are the most common mistakes women make when applying foundation:
1. Choosing the wrong nuance
All make-up artists are of the opinion that foundation should be in the same tone as your natural complexion. To determine the perfect tone for your skin apply a line of each of the 3 or 4 colors that seem closest to your complexion to your jawline and choose the one that blends most invisibly.
2. Applying foundation with force
If you assert too much pressure on your sponge or applicator you will not get a better coverage. All you will accomplish by rubbing too hard is reddening of the skin and an uneven distribution of foundation. For a better effect use your fingertips and apply the foundation with light circular motions.
3. Applying foundation with insufficient light
If the room is too bright or too dark you will not be able to see properly and cover all of your face evenly. When you go outside, the daylight will make your mistakes visible. Our advice is to create your makeup in the same light in which you will be wearing it.
4. There are visible traces on your neck or chin
Make sure you spread and blend your foundation, especially around the edges. Pay extra attention to the following areas: the hairline, under and around the nose, the ears, the chin and jawline and especially the neck.
5. You are applying more than is needed
If you are trying to cover up some defect, you should know that masking it over with foundation has the reverse effect. Spread the foundation in an even layer over your whole face; do not pile it in one area, because this will attract attention to this area.
6. You are using excessive amounts of the product
Your skin needs air, so in this case “The less the better” is the rule to go by. Otherwise you may be mistaken for a clown.
7. You have not prepared the skin before applying foundation
First of all you have to clean the skin. Then you have to hydrate it with a moisturizing lotion. You can begin applying foundation once the moisturizer is completely absorbed.
Key Lime pie is one of those desserts that screams SUMMER, but it is so refreshing and delicious, it would be a shame to only indulge in this for one season. These parfaits have the scrumptious taste of Key Lime Pie, but have the beautiful presentation of a parfait.
And the dessert is so simple, you will have a great dessert with very little fuss. I love to eat this in my backyard with my feet up while I relax and watch butterflies having fun:-) In the winter, enjoy this and smile when you think of what a great summer you had. For a great touch for entertaining, try serving these in shot glasses with mini spoons.
A gratuitous whipped cream shot. There is nothing quite like homemade whipped cream. Are you convinced? Ingredients
3 tablespoons unsalted butter
2 tablespoons white sugar
1/4 cup powdered sugar
1 tablespoon light brown sugar
1/2 cup graham cracker crumbs
1 14-ounce can sweetened condensed milk
1/2 cup fresh lime juice
1 tablespoon grated lime peel
1-2 cups chilled whipping cream
Pure Vanilla Extract
Directions
Melt butter in heavy small skillet over medium heat. Mix in sugar and stir until bubbling, about 1 minute. Mix in crumbs; stir until color deepens, about 3 minutes. Turn out onto plate and cool.
Stir condensed milk, lime juice and lime peel in large bowl to blend (mixture will thicken).
For whipped cream topping, beat 1 cup whipping cream in bowl until stiff peaks start to form. Add 1/4 cup powdered sugar and 1 teaspoon vanilla. Make sure the bowl and the beaters are cold. It helps if you put the bowl in the freezer and the beaters 10 minutes before you make the whipped cream.
Using electric mixer, beat cream in medium bowl until firm peaks form; fold into lime mixture.
Place 1/4 cup lime mousse in each of six 8- to 10-ounce wine goblets. Top each with 1 tablespoon crumb mixture, then 1/4 cup mousse. Top parfaits with remaining crumb mixture. Refrigerate at least 1 hour and up to 4 hours. Just before serving, add a generous dollop of whipped cream.
Stay tune I'll be back with more recipes ! LOVES xox
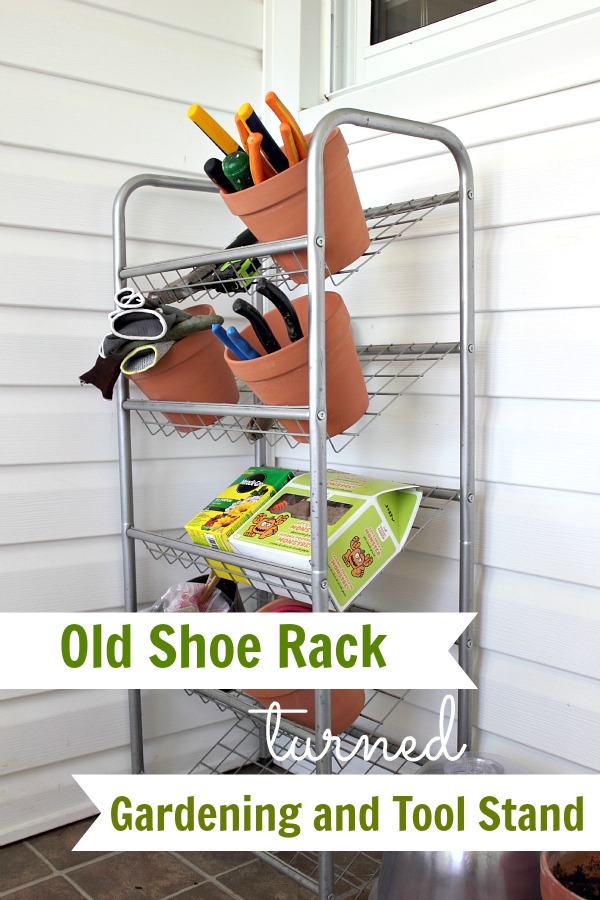
Now that gardening season is upon us this gardening organizer is perfect! You’ll use an old shoe rack and some clay pots! So easy to set up and use, you’ll be able to see everything you need to make your garden beautiful!
Well, it might not be the prettiest thing, but it sure makes me happy every time
I see it sitting there in the corner of my mud room, all ready to help whenever
needed.
We've had a bit of a problem since moving into this house almost
two years ago. Our garage is a disaster zone unlike you've ever seen. I promise
you. The tools and hardware and junk are all piled together in giant heaps on
top of the various work benches. So finding anything is nearly impossible, if
you can even get to the work benches past the bikes, several ride-on lawn
mowers, stacks of flooring waiting to be installed and power tools all over the
floor. It's bad.
There's a little skinny hard-to-get-to cupboard in the
house that I was using, but it wasn't working out so well, and my "house tools"
kept mysteriously ending up back in the garage.
I found this old shoe rack in the basement, and you might have one just like it
lurking around somewhere. I put it by the door to the mudroom and now everything
I need is right there waiting for me on my way outside. The little angled
shelves are perfect for grabbing whatever I need quickly and easily. Terra cotta pots make it even easier to fill er' up with all my gardening and
quick home repair necessities. So what do we have here? Just the basics. Stuff I use everyday-ish. A hammer,
tape measure, screw drivers, and wrenches, gardening gloves, a little shovel and
some pruners, seeds and fertilizer, and some tie-downs for when we're taking
yard waste to the recycling center.
As I recover more and more useful
tools from the garage, I have room for them on my little stand! It's a silly
little thing, but it makes me happy.
Well, yes, it probably would make me even happier if I just cleaned out the
garage. I'm hoping to get started on that one too a bit this month. Until then, I'm happy with my little shoe rack.:)
Let’s face it: when you’re out on your own for the first time it can get ridiculously expensive to decorate your first place. And if you have a lot of pictures of friends and family lying around but not a lot of picture frames you could be looking at a very expensive problem…unless you turn to this neat DIY tape picture frame ! Using simple materials like ribbon and tape you can create a unique and cool frame that suits your sensibilities.
One thing that you do need to keep in mind is that, since you’re using tape, you need to make sure your pictures are secured and don’t have too much tape residue on them as that can make it a bit difficult to remove the frames without tearing your photos. However you could always remedy this problem by simply making copies of your photos.
When I moved into my first apartment a year and a half later, I had mostly abandoned this style of decorating. Instead, I was determined to make my new living space as adult as possible. After all, this was a real apartment. Equipped with cheap frames from the dollar store, I arranged several of my own photographs on my bedroom walls. Even if they weren’t expensive custom frames, they made me feel infinitely more grown up.
Indeed, there is something inherently sophisticated about hanging picture frames on one’s walls. Perhaps it’s because they lend a space some semblance of intent, rather than the feeling that random bits have been thrown together. Unfortunately, many rentals and dorms restrict frame use because of rules forbidding nails or tacks. Additionally, frames can be cumbersome to move and ones that aren’t from the dollar store can be quite costly.
As a cheap, easy and surprisingly chic alternative, consider framing magazine clippings, photographs and postcards with different colored tapes. The supplies travel lightly, can be changed frequently and can be purchased for very little.
To make these fun and stylish tape picture frames, all you’ll need are a few images to frame, one or more kinds of decorative tape, scissors and an X-Acto knife or similar blade. For tape, we used Japanese washi tape (available at many craft stores or online here), black masking tape and copper foil tape. Tape comes in all shapes, sizes, colors and textures, so do some browsing and find what you like best!
When you have your materials assembled, begin by taping up a single image. It’s important to tape up and frame your images one at a time so you can be sure of how much surrounding wall space you’ll have left. Once your image is up, take a roll of tape and make a frame around your image, adjusting the size and amount of interior space to your liking. As illustrated in the first image, you can go far beyond a simple rectangular frame. Mix it up! If there are bits of tape that are longer than others or overlapping in awkward ways, use your X-Acto blade to carefully trim off the excess. Move the blade lightly over the tape to avoid putting marks on the actual wall. This technique is especially useful when making non-rectangular frames.
Ta-da! That’s it! Easy peasy. Now gather some tape and some pictures, and make yourself some snazzy frames. I guarantee you’ll feel instantly fancier.
It's long weekend and there are so much things we can plan and if you are not going any where than here's the fun way to create your own style at home :)
When people think of DIY clothes they tend to think of making things like dresses or shirts and other things that are fairly standard. This amazing DIY zipper sleeve from Trash to Couture is a great way to set yourself apart from everyone else making their own clothes. Using an already made tee shirt and a zipper you can get a unique look.
The site also suggests that you can replace the tee shirt with a simple yard of fabric. It all comes down to what you think would look best. Mixing and matching different fabrics and patterns could be a great way to really customize this simple but stylish look. If you want to learn how to make this shirt then click here!
Look like you spent a fortune without the extravagance. These lovely drop earrings feature the very popular yellow center stone set in gold with clusters of smaller crystals. Magnificent! - 14K goldplate, CZs - 1" long - Lever back clasp
• Cleanse once a day to remove impurities, sweat and oily deposits. Repeat at night for oily or acne-prone skin. • Avoid soaps and harsh cleansers with added fragrance or color. • Choose a cleanser with glycolic and salicylic acid to remove dead skin cells and organic debris that cannot be removed by regular cleansers.
Exfoliate • This step should become part of your basic routine. It is the
Advertised as the epic finale of a trilogy, "The Hangover Part III" isn't so much a movie as it is a marketing plane that happens to be projected on movie screens. The first film worked in part thanks to the easy/lazy byplay between its three dude-sketeer leads, Bradley Cooper, Ed Helms and Zach Galifianakis, and in part thanks to the plot's "Memento"-on-meth arc, as the three had to piece together a Vegas bachelor party night they couldn't remember throughout
Happy Friday! I hope everyone had a great week. I kept thinking of how quickly time is flying by because I’ve been so busy lately.
I have a really fun and simple appetizer idea for you today….they are pretty to look at, too! Salad on a stick? I gave this classic Italian salad that I absolutely love a brand new look and made it a little bit more fun. They are very impressive looking and very tasty. I could eat a huge plate of these by myself.
So if you are looking for an easy idea for an appetizer this one is perfect for you. It would also be great to serve at a large party or a barbeque…I’m sure people would appreciate a healthy alternative to munch on, not to mention the beautiful presentation!
INGREDIENTS:
cherry tomatoes small fresh mozzarella balls basil leaves balsamic vinegar salt and pepper, optional toothpicks
DIRECTIONS:
Place one cherry tomato, a basil leave (or half a leaf if it is large), and a mozzarella ball on each toothpick.
Drizzle with balsamic vinegar if desired, leaving the end of the toothpick clean, and sprinkle with salt and pepper. You can also serve the balsamic on the side and let your guests drizzle on their own.
Stay tune I'll be back with more yummy recipes ! LOVES xox

")


)")
)")
)")
)")
)")


")
